Quick Tutorial Using Products You Probably Have at Home!

If there’s one part of Easter that we can all agree is the most fun, it’s decorating eggs. As a wonderful family tradition, there are hundreds of different styles and designs you can create. Not to mention your kids will love having an activity to show off to their friends and family members. Over the years, Easter egg dying has become more of a commercialized activity.
However, you don’t need to buy store-bought products. In fact, with this tutorial, you likely already have everything you need right in your kitchen. No matter if you’re doing a last-minute dye or if you’re trying to stick to a budget this Easter, our tutorial for dying Easter eggs quickly and at home will become quite useful.
Step 1: Gathering the Materials
First, you’ll need to check your cupboards and drawers to make sure you have everything you need. If not, a quick trip to the grocery store should suffice. If you want to take the decorating a step further, consider buying sprinkles and stickers from your local craft store, though it’s not a necessity for this DIY tutorial.
To dye your eggs at home you’ll need:
- 1 x Utility knife
- 1 x Paper clip
- 1 x Rubber ear syringe (optional)
- Food coloring (colors of your choice)
- Hot water
- Multiple plastic cups (correlating to your color choices)
- Tongs
- Tape
- Scissors
- Rubber bands
- Glitter and embellishments (optional)
Step 2: Preparing the Eggs
There are two ways that you can prepare your eggs to be decorated. Most people find that it’s easier to simply hard boil them, however, they won’t last as long as this method. If you’re doing this project with kids, you’ll need to take over for this step, as it can get messy if done improperly.
First, you’ll want to use the utility knife to poke a hole in the top and bottom part of the egg. You won’t want to make the hole too large, as it can take away from the surface area you have to decorate. Taking the paper clip, insert it through the top hole and move it around, mixing the yolk inside of the egg.
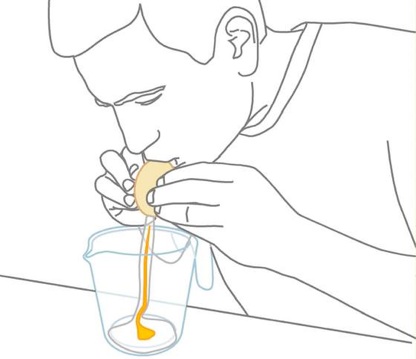
At this point, you can either use your mouth or a rubber ear syringe (if you have one). Blow through the top hole and allow the yolk to exit the egg through the bottom hole. This is likely the most time-consuming part of the process, but it’s necessary for the best possible preparation. After this is done, you can use the egg yolk for baking or another recipe.
Another important part of preparing your eggs is to figure out if you want to have any particular designs. In the event that you want stripes, polka dots, or abstract lines on the eggs, you’ll need to use the rubber bands and tape. This is because any section that is covered by the bands and the tape will not get dyed and remain blank, as a striking contrast. However, during this process, make sure that you are careful, as the eggs are quite delicate without their yolk.
Step 3: Preparing the Dye
After setting the prepared eggs aside, it’s time to make your dye. This is one of the most fun parts, aside from actually decorating the eggs. It’s highly recommended that you research free egg dye charts in order to figure out how to make a wide array of colors that you’ll love. Often times, it’s not as simple as putting one drop of coloring into the water, especially if you want highly pigmented eggs.

Get It Here
Once you have an idea of the colors you want to use, you’ll need to fill the correct number of cups with water. You can then use the food coloring to create the dyes that you will use on the eggs. Make sure they look pigmented, though not to the point where it will dye your entire kitchen!
Step 4: Dipping the Eggs
Using your kitchen tongs, grab the first egg that you want to decorate and dip it into the colored water. You may have to leave it submerged for up to 30 seconds in order for the most color to be absorbed into the shell.
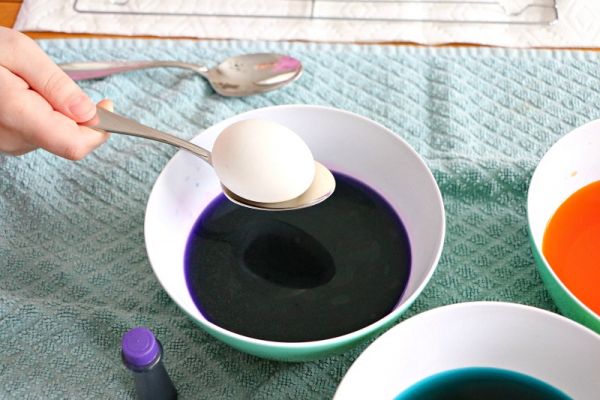
You can always check on the egg by removing it from the water until it reaches your desired intensity. Once it has been dyed, place it on an egg stand or a plate to dry thoroughly.
Step 5: Extra Decorations
This step isn’t mandatory, but it’s a fantastic way to put your own personal twist on your eggs. Additionally, adding extra decorations and embellishments can help to hide any errors that happened during the dipping process. If there’s one type of decoration that we highly recommend, it’s glitter. There’s nothing quite as beautiful as adding a little bit of sparkle to Easter eggs. You can also opt for paint pens if you want to draw finer details onto the eggs, such as monograms or butterflies.
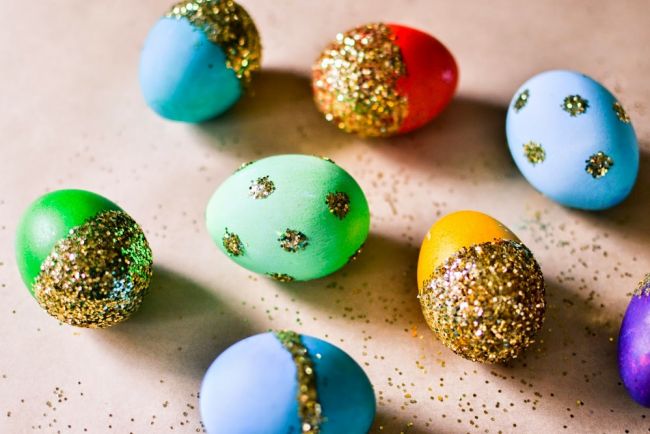
Another great idea for extra decorations is to use stencils to paint on different images. This is a project that your kids are sure to appreciate, as it takes the decorating a step further without getting too complex.
Step 6: Display the Eggs

After the dye and any other décor you’ve added has dried, you can then display the eggs around your home. You can also give them as a gift to a friend or family member who particularly loves Easter!
Final Thoughts
As one of the most creative holidays during the year, decorating your Easter eggs is a lot simpler than you’d think. There’s no need to spend hundreds of dollars on decorating kits and tools, especially when you already have everything that you need at home. The most you might have to buy is food coloring and any extra embellishments that you’ll want to add.
The main reason as to why this tutorial is such a great idea is that it’s safe for kids, requires non-toxic materials, and is a fantastic way to get the whole family together. This Easter, take your decorating to a whole new level and decorate beautiful and unique eggs!
Pin for later