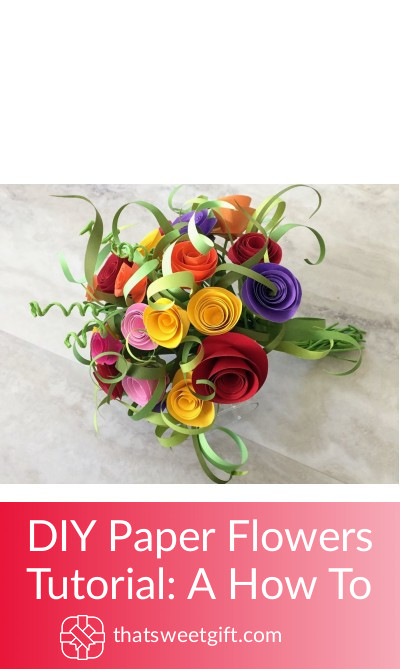
DIY Paper Flowers Tutorial: A How To

Looking for a fun project to do at home with your kids or friends? A great DIY project is a wonderful way to spend an evening or a weekend afternoon, especially when you end up with something beautiful you can give as a gift or keep for yourself!
Paper flowers make for gorgeous decorations at a baby shower, bridal shower, or just to decorate your home with! Best of all, you don’t have to worry about watering them and they won’t die on you! The perfect solution! If you are worried that you won’t be able to make your own, think again!
Most people think that paper flowers are very hard to create, but there are plenty of easy tutorials that anyone can follow- that’s right: Anyone!! If you’ve been waiting for the perfect time to get craft, why not give these paper flowers a try?
If you’ve got a party coming up, or just want to find a fun craft to take on, check out this paper flowers tutorial! Best of all, you can customize this to fit just about any event or season. Spring time party? Go for fun, bright colors! Christmas party? Go for deep reds or fun icy blue.
Let’s get started!
What You’ll Need
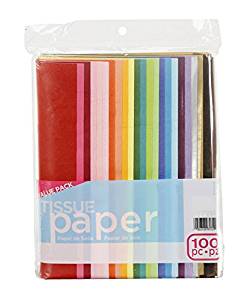
✓ Tissue paper (we recommend two different shades for the petals and a shade of green for leaves – but pick whatever shades you want!)
Get It Here
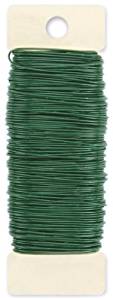
✓ Floral wire (this is what the tissue paper will actually attach to)
Get It Here
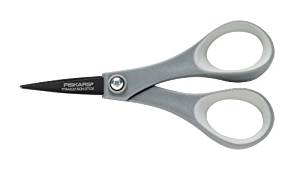
✓ Scissors
Get It Here
What You Need to Do
We recommend purchasing tissue paper that comes pre-folded, which is easy to find. Purchase your three shades and take out two sheets of each color. Keep in mind you can always use more to make larger flowers!
Next, take your scissors and cut your tissue paper. Cut your green tissue paper and one petal color the same length (whichever color you want to be the outer part of the flower) and trim your inner petal color to be slightly shorter.
Now it’s time to layer! Unfold all of your tissue paper and place the green sheets on the bottom, then your outer petals, followed by the paper for your inner petals. Make sure the inner petal sheets are centered on top of the other sheets.
 With your paper all stacked correctly start to fold the sheets in an accordian style. Make each fold around 1 inch in length. Fold all the way!
Separate the colors once you have them folded and take your green sheets and cut both ends into a point to form your leaves (or if you want to have more rounded leaves you could cut them round- but the pointed shape will help them stand out from your round petals!)

Take your two petal colors and cut the ends of each of those sheets in a round shape to form your petals. You can either freehand this or take a round jar or bottle to trace an outline.
It’s time to layer again! Place your green paper on the bottom, followed by your outer petal paper, followed by your inner petal paper. Keep them all centered just as you did the first time.
Fold your stack of tissue paper in half and secure it with your floral wire at the middle bend. Twist the wire to secure it at the back part of the flower (which is the bottom of the stack on the green side which will form your leaves).
Once secured open the tissue paper to fan out in a circle to form your flower!

Now it is time to make the flower look more realistic- start slightly pulling on the petals and crumpling them slightly to make them look more petal-like. Pull the paper towards the center and let it form its shape. It’s okay if some of the paper tears – that is likely to happen since you are working with such delicate tissue paper!
Finally, make sure you can see your leaves peaking out at the bottom – you can pull on them slightly and arrange them as you like. We recommend keeping them flat to contrast the full, fluffy petals!
Wrapping Up
That’s it! That doesn’t sound so hard, does it? What we love about this particular paper flower tutorial is that it doesn’t require any glue, and requires little cutting as well! This is a fun and easy craft that anyone can handle. The result is beautiful 3-D paper flowers that you can easily place as a centerpiece at a table, or attach to a wall or backdrop to form a beautiful artistic wall for a party or in a child’s room.
Like we mentioned earlier, you can also make these flowers unique easily by selecting different colors and by cutting the ends in different shapes! We love the idea of taking a darker and lighter shade of the same color to form the petals for a beautiful ombre effect. Or, go with contrasting colors for a bold, fun look!
No matter the occasion, you can make these paper flowers easily and use them to add to your decor. Use more paper and trim the paper less to make larger flowers, or trim it down more to make smaller versions! With simple adjustments you can make pretty big changes, and all without having to work too hard!
This is a fun project that has a big payoff. How will you make it your own? Enjoy!
Pin for later