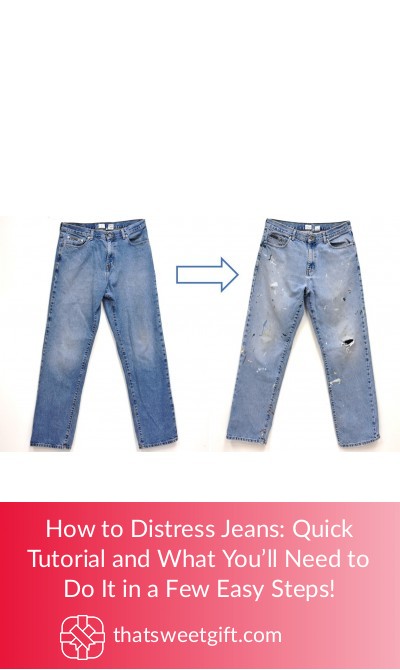
How to Distress Jeans: Quick Tutorial and What You’ll Need to Do It in a Few Easy Steps!

The trend of distressed jeans isn’t going anywhere in the near future. When you visit your favorite store, you might start to question why you’re spending so much money on jeans that have rips and tears in them. Instead, what might make more sense is to spend less on perfect jeans and distress them yourself at home.
With the help of this easy-to-follow tutorial and distressing tips for your jeans, you can create the perfect customized pair that will have all of your friends jealous. Plus, this is the type of project that you can do with your jean shorts or jean skirt, as well as denim jackets!
What You’ll Need
First and foremost, it’s important to think about all of the tools you’re going to need for the job. In this tutorial, we’re going to go over the basic aspects of creating professional rips and tears in your jeans. If you want additional distressing, such as acid washing, you’ll need a variety of other items.
✓ Chalk: Chalk is one of the most important tools because it gives you the ability to mark out where you’re going to want all of the rips and tears. Otherwise, you’re going to be working blind.
✓ Tweezers: We’re going to use tweezers to create finer details so that it doesn’t look like you have two slits of fabric on the front of your jeans.

✓ Box Cutter: The most important tool for the job is your box cutter, as it is what is responsible for making the cuts. You may also be able to use scissors, however, we find that using a box cutter is far simpler and more efficient.

✓ Safety Pin: As an added distressing tool, having a couple of safety pins on hand can help you to further distress the jeans for a personalized touch.
How to Distress Your Jeans

Now that you are aware of all of the tools you’ll need for the project, it’s time to get into it.
Step 1: Marking the Distressed Areas
The first thing you’re going to want to do is to put the jeans on and stand in front of a full-length mirror. Using the mirror, determine which areas of the pants you want to distress, such as the knees or the thighs. Using the chalk, mark out an area that is two inches above and two inches below where you’re going to want to distress.
For the purpose of this tutorial, we’ll use the knee as an example. To get the perfect ripped knee, you’ll want to mark two inches above the knee and two inches below it as well.
Step 2: Preparing the Jeans
Now that you have a good idea of where you want the distressing to be placed, it’s time to prepare the jeans to be cut. We highly recommend stuffing the leg with a magazine, newspaper, or even an old shirt to protect the back of your jeans from being cut as well.
As soon as you start using the box cutter to tear through the denim, you may also knick the back of the jeans as well, which takes away from the professional distressed look.
Step 3: Distressing the Jeans
As soon as you have stuffed the areas with a newspaper or a magazine, you can now begin the distressing process. Taking the box cutters, start to slide along the lines that you have marked on your jeans. Continue to slice between these marks, creating horizontal strips that are about ½ of an inch wide.
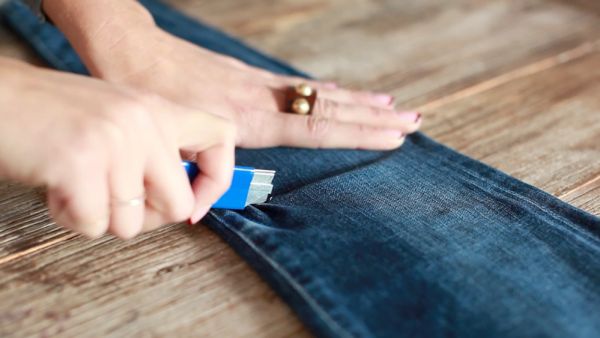
We highly recommend making each strip a different length than the next, as this creates more of an authentic appeal and as you wear the jeans more often, the tears will take on unique shapes for themselves.
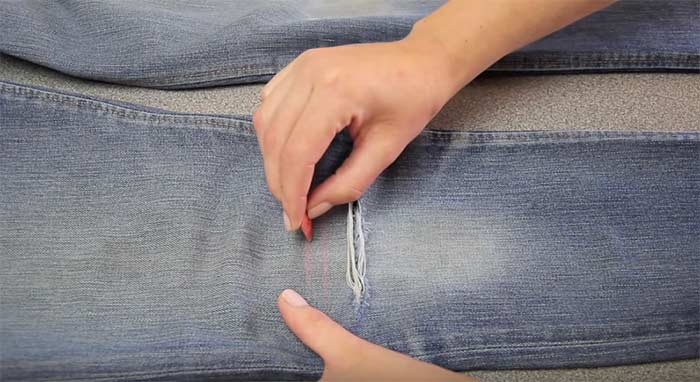
Step 4: Making Finer Details
Once you have created all of the slits that you think will look the best, it’s time to use your safety pin to tease the white threads out of the denim. Using the sharpest end of the pin, you should be able to pull out the white strings so that they hang loose. You’ll want to take your time doing this, as the white threads are very easy to break, and you need them to stay intact.
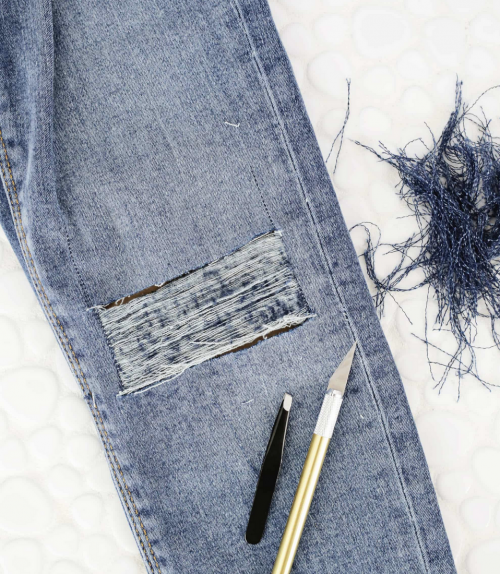
As soon as you have taken out enough white threads using the safety pin, it’s time to rely on the tweezers to create an even more distressed look. At this point, there should be a frayed edge for each strip that you cut with the box cutters.
Using the tweezers, start to pull apart the frayed eyed, exposing vertical threads. This will be the beginning of the ripped hole on the knees of your jeans.
Step 5: Making Any Adjustments
At this point, your jeans should be thoroughly distressed. You’ll want to try them on again and take a look at all of the frayed edges and exposed threads to determine if you’re happy with the way they look. If you find that the jeans could use a little more distressing, follow the previous steps until they have the perfect look.
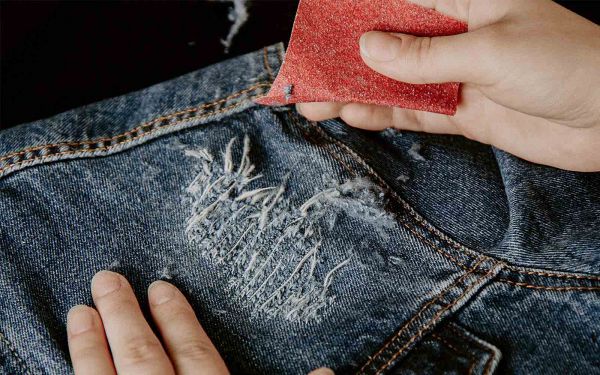
In addition, if the jeans look like they aren’t naturally distressed, one trick is to use sandpaper. With a single sheet of sandpaper, you can gently wear away at the denim so that it looks naturally worn away with minimal effort.
Tips for Distressing Jeans
Below are some of our favorite tips to help make distressing jeans easier and more exciting.
✓ Work Slowly
It’s far too easy to take distressing too far to where the jeans literally fall apart at the knees. It’s important that you work slowly and take your time so you can achieve the perfect amount of distressing without actually destroying your jeans.
✓ Use Embellishments
Aside from the tears and rips, you may also want to consider adding extra embellishments, such as patches, to the jeans. This will surely give them a personal touch that accentuates your style.
✓ Practice Makes Perfect
The more often you distress your clothing, the easier it will get. Working with different types of fabrics can be tough and your first pair of jeans may rip faster than you had hoped for. Over time, you’ll learn the best ways to distress different materials so they last longer.
Pin for later